Tutorial 6: Difference between revisions
No edit summary |
No edit summary |
||
| Line 1: | Line 1: | ||
=Tutorial 6= | =Tutorial 6= | ||
==Add | ==Add media== | ||
===Step 1=== | ===Step 1=== | ||
To add | To add media, such as an image, to your Item you first have to upload the image to the database. | ||
You | You will be able to upload files up to 100 MB, however, as our server space is limited, we recommend keeping the file size between 100 KB–400 KB ideally. To easily reduce the file size (without losing much in image quality) we recommend using the free service Optimizilla, which you can find at [https://imagecompressor.com/ this link] unless you already have a go-to software for this. | ||
===Step 2=== | ===Step 2=== | ||
https://daap.bannerrepeater.org/w/images/7/7a/ | https://daap.bannerrepeater.org/w/images/7/7a/Tutorial5_img1.png | ||
When you have your image ready navigate to the Main Page by using [https://daap.bannerrepeater.org/wiki/Main_Page this link] or the quick link in the sidebar . | |||
''' | Click on the link [https://daap.bannerrepeater.org/wiki/Special:Upload "Upload new media"] under Adding new data on the Main Page. | ||
===Step 3=== | |||
https://daap.bannerrepeater.org/w/images/d/dd/Tutorial5_img2.png | |||
Click on the button "Choose file" and locate the file on your computer. Click "Open". | |||
===Step 4=== | |||
https://daap.bannerrepeater.org/w/images/9/9c/Tutorial5_img3.png | |||
The "destination filename" field will be filled out automatically by the system with the current name of the file. You will need to remember the name of the uploaded file for later so we recommend that you note it down or change the way the file is named on the database so that it will be easy to type in. You change the name of the uploaded file in the field named “Destination filename”. We recommend that you choose a descriptive name, such as “(publication name) front cover”. | |||
===Step 5=== | |||
https://daap.bannerrepeater.org/w/images/e/e0/Tutorial5_img4.png | |||
In the field "Summary" you can write a short description of the images you are uploading e.g. "Front cover of the book ...". | |||
===Step 6=== | |||
https://daap.bannerrepeater.org/w/images/c/cc/Tutorial5_img5.png | |||
'''Licensing:''' | |||
Click on the drop down menu to select the form of licensing that applies to your image. | |||
We have three types of licenses in the database: | |||
1. Public domain (CC0), which means you give up all rights to your work (we don’t really recommend this unless it’s a conceptual part of your work). | |||
2. Creative Commons license – there are a range of nuance and variation among these, but there are very good sources online to pick and choose the right one for you. For example, you can read more about all CC options here, or use the Chooser tool here. | |||
3. Copyrighted, meaning you reserve all your rights and no one can use your image for any purpose without your permission; This can be necessary sometimes, but our recommendation is to consider among the more nuanced creative commons options. | |||
===Step 7=== | |||
===Step | '''Upload Options:''' | ||
Here you have the option to check the box "Watch this file" if you would like to receive a notification every time another user applies any modifications to the file. You can control notification preferences in your user settings if you change your mind later. | |||
Do not check the box for “ignore any warnings”. | |||
===Step 8=== | |||
https://daap.bannerrepeater.org/w/images/3/31/Tutorial5_img6.png | |||
Click on the button "Upload file" at the bottom of the page. | |||
You have now uploaded the media file to the database and you will be automatically redirected to the media file page of the uploaded file. | |||
===Step 9=== | |||
https://daap.bannerrepeater.org/w/images/7/76/Tutorial5_img7.png | |||
To link the uploaded media to your Item page copy the file name, which you find at the top of the page of the uploaded and saved file. | |||
===Step 10=== | |||
Go to your item page and click on "+ add statement". | |||
https://daap.bannerrepeater.org/w/images/4/43/Tutorial5_img8.png | |||
In the box for properties start writing "image" and select the auto suggested property "Image". | |||
https://daap.bannerrepeater.org/w/images/7/75/Tutorial5_img9.png | |||
Click on the | In the next field to the right paste in the file name for the media file page you copied before. If you don’t have it copied you can just start typing the file name and corresponding files will be auto suggested as you type. Click on the auto suggested options to select them. | ||
https://daap.bannerrepeater.org/w/images/ | Now you can press save and your image will be linked to your Item page, or, you can add some qualifiers before you save. | ||
===Step 11=== | |||
https://daap.bannerrepeater.org/w/images/2/2e/Tutorial5_img10.png | |||
To do this click on "+ add qualifier". | |||
In the field that appears you can choose different properties. Some that you may want to add if your media is an image the qualifiers which can be used with this property are “depicts”, “annotation” and “license”. | |||
'''Depicts:''' is used to describe what this image depicts : front cover; back cover; title page; etc. | |||
'' | '''License:''' will be the license under which this copyrighted work is released. | ||
'''Annotation:''' are notes to the image. | |||
Once you have entered the data for your qualifiers, press “save”. | |||
You have now added an image to your Item. | |||
===Step 12=== | |||
If you are adding other media, that is not the work itself but rather secondary documentation related to it, such as an image from an event, a video or an audio file, it has a similar process but is added using the property “digital artefact”. Digital artefacts will appear in a different section on the front-end so even if they may also be images, make sure you use this property instead. | |||
To see an example of how the property “digital artefact” is used go to our Example Work Page and scroll down to the statement “digital artefact”. You can always find the Example Work Page under the header “Example artwork pages and case studies” on the Main Page. | |||
You can | |||
The property “digital artefact” requires a URL to be entered as its value. If what you are adding is: | |||
'''An image:''' | |||
Follow Step 1-8 of this tutorial. When you get to Step 9, instead of copying the file name you need to copy the URL from the address bar in your browser of the page of the uploaded and saved image file. You can get this URL also by right-clicking the image and using the Copy Image Location option from the contextual menu. | |||
https://daap.bannerrepeater.org/w/images/ | https://daap.bannerrepeater.org/w/images/6/6a/Tutorial5_img11.png | ||
'''A video or sound file:''' | |||
===Step | To link a video or a sound file to your Item, it needs to be uploaded to another website such as Soundcloud, YouTube, Wikimedia Commons, among others. Copy the URL used to access the media file at the site where it is uploaded. In Wikimedia Commons you can copy the URL to the file from the address bar. | ||
===Step 13=== | |||
When you have copied the URL to your media file follow Step 10 - 11 of this tutorial, but instead of using the property “image” in your statement you need to use the property “digital artefact”. As the value to your property you paste the URL you have copied. | |||
Before you press save you can add which format the file is in. To do this press “+ add qualifier” and start typing “format” in the property bar. It will be auto suggested as you type. | |||
“+ add | |||
To add the value in the next bar, choose “image file” if your file is an image, or alternatively “video file” or “audio file”, as it corresponds to the file. | |||
https://daap.bannerrepeater.org/w/images/b/b6/Tutorial5_img12.png | |||
As an optional step, if your file is an image, you may also add an additional qualifier using the property “licence” to add under which licence you are sharing the image. In the value bar start typing the name of the license you chose when uploading the image. The license which will be auto suggested as you type. Click on it from the suggestions to choose. | |||
Press “save”. | Press “save”. | ||
Revision as of 22:22, 30 July 2021
Tutorial 6
Add media
Step 1
To add media, such as an image, to your Item you first have to upload the image to the database.
You will be able to upload files up to 100 MB, however, as our server space is limited, we recommend keeping the file size between 100 KB–400 KB ideally. To easily reduce the file size (without losing much in image quality) we recommend using the free service Optimizilla, which you can find at this link unless you already have a go-to software for this.
Step 2
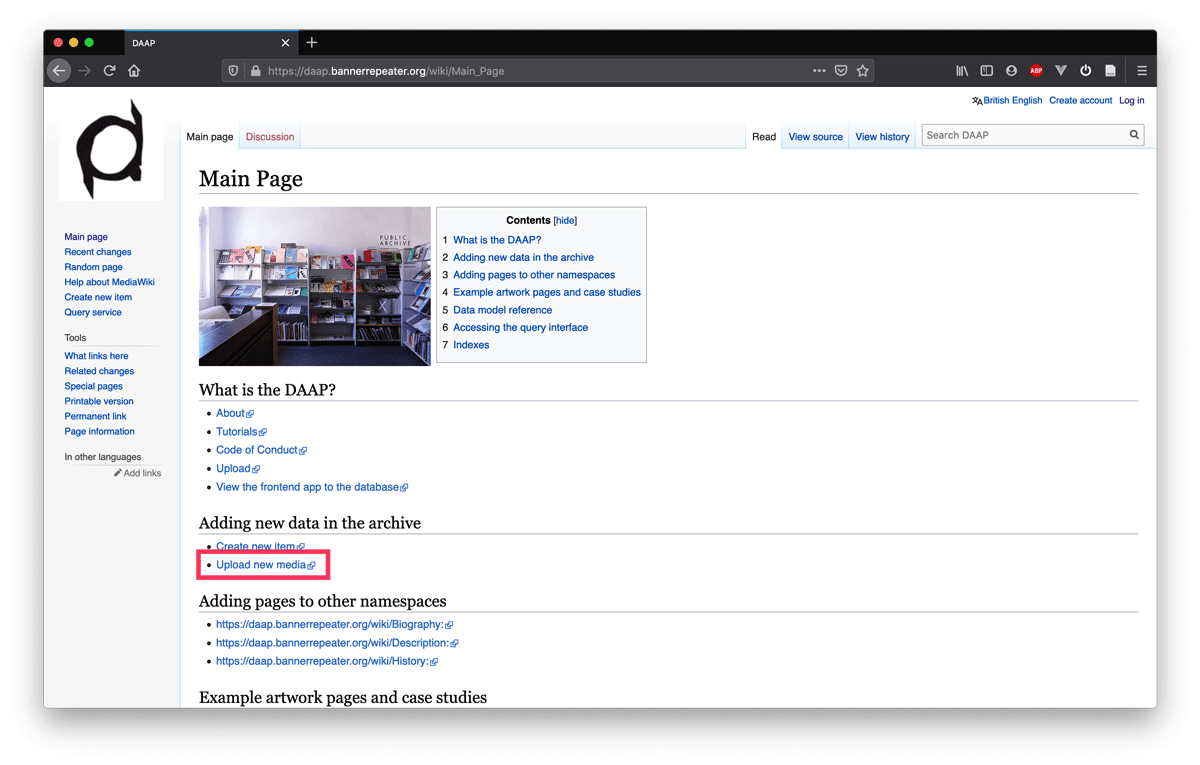
When you have your image ready navigate to the Main Page by using this link or the quick link in the sidebar .
Click on the link "Upload new media" under Adding new data on the Main Page.
Step 3
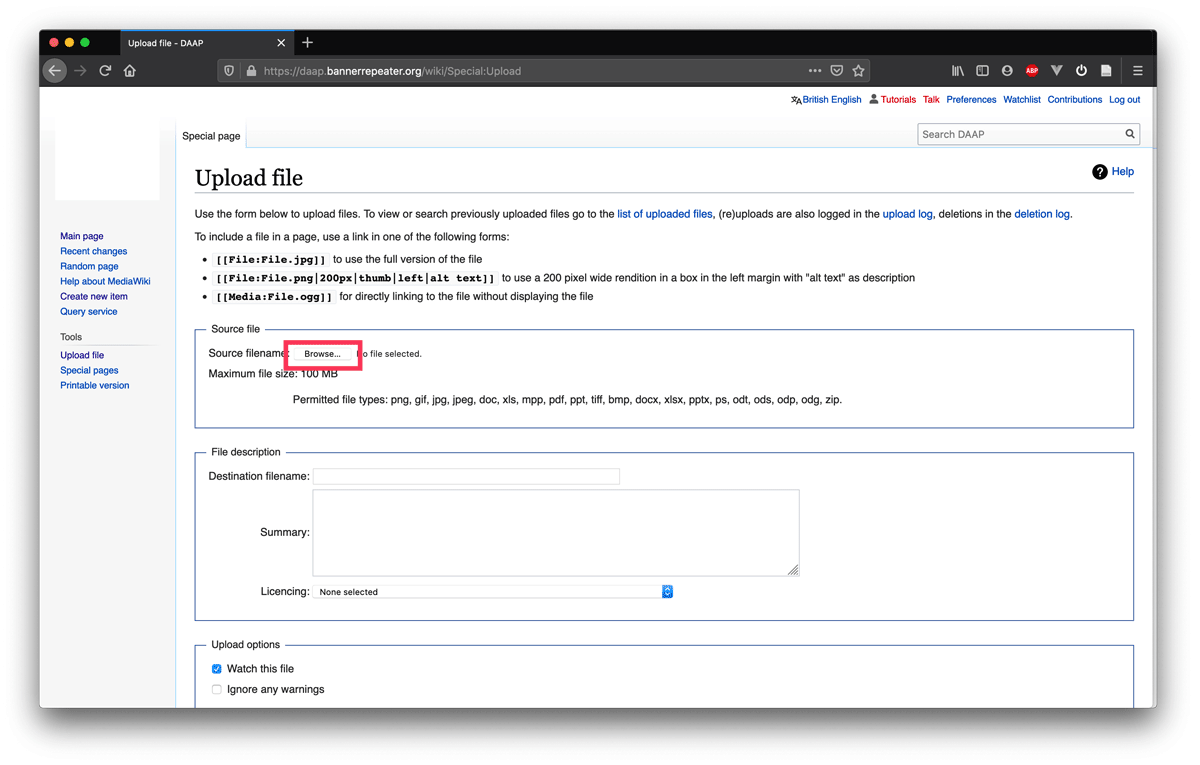
Click on the button "Choose file" and locate the file on your computer. Click "Open".
Step 4
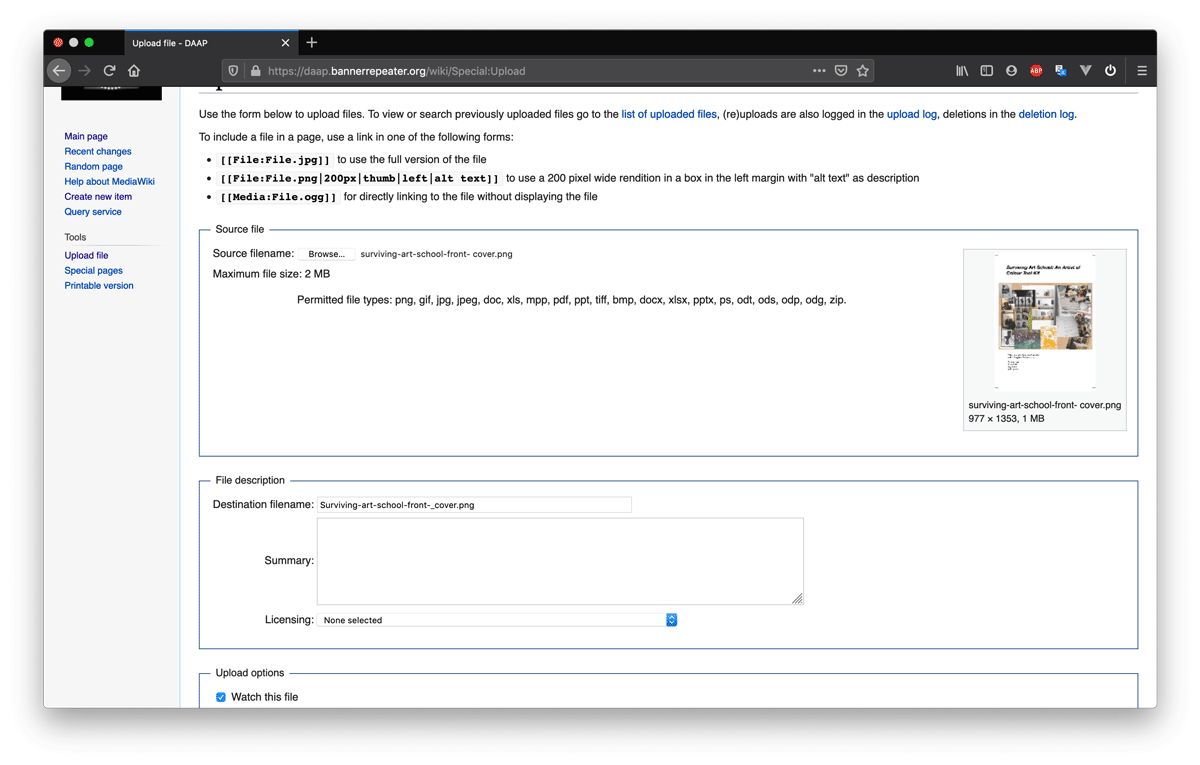
The "destination filename" field will be filled out automatically by the system with the current name of the file. You will need to remember the name of the uploaded file for later so we recommend that you note it down or change the way the file is named on the database so that it will be easy to type in. You change the name of the uploaded file in the field named “Destination filename”. We recommend that you choose a descriptive name, such as “(publication name) front cover”.
Step 5
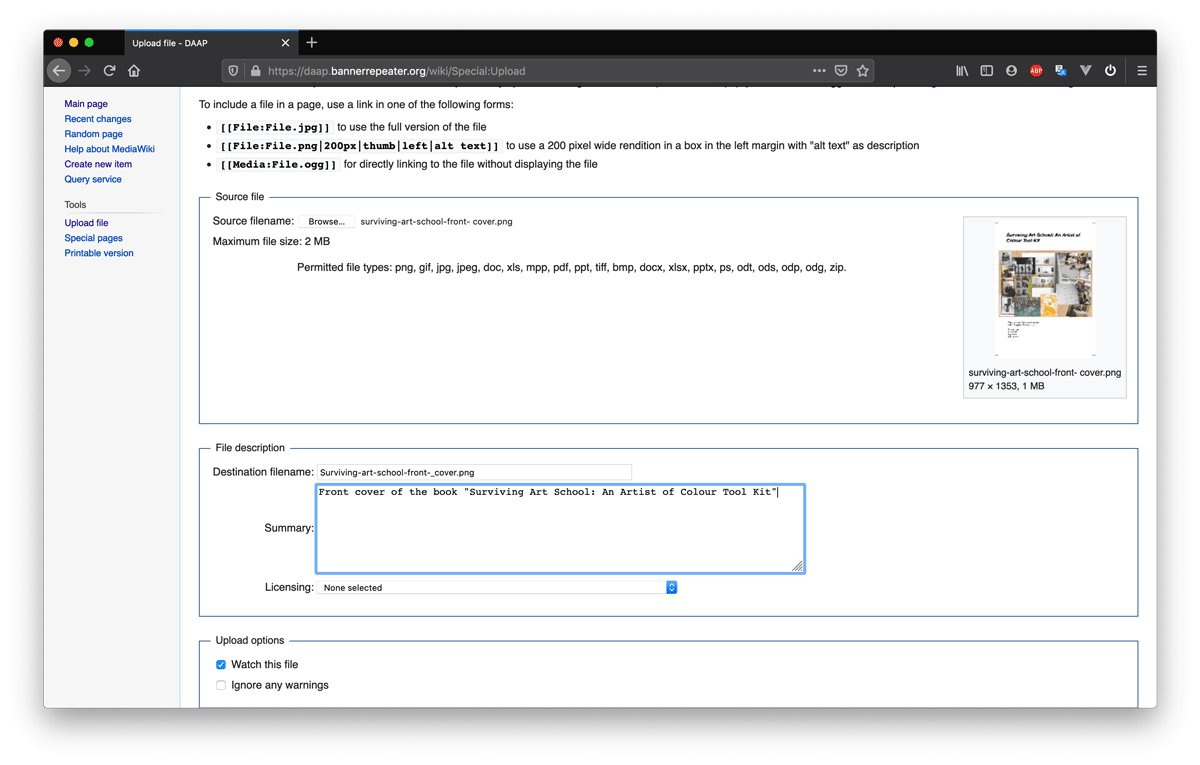
In the field "Summary" you can write a short description of the images you are uploading e.g. "Front cover of the book ...".
Step 6
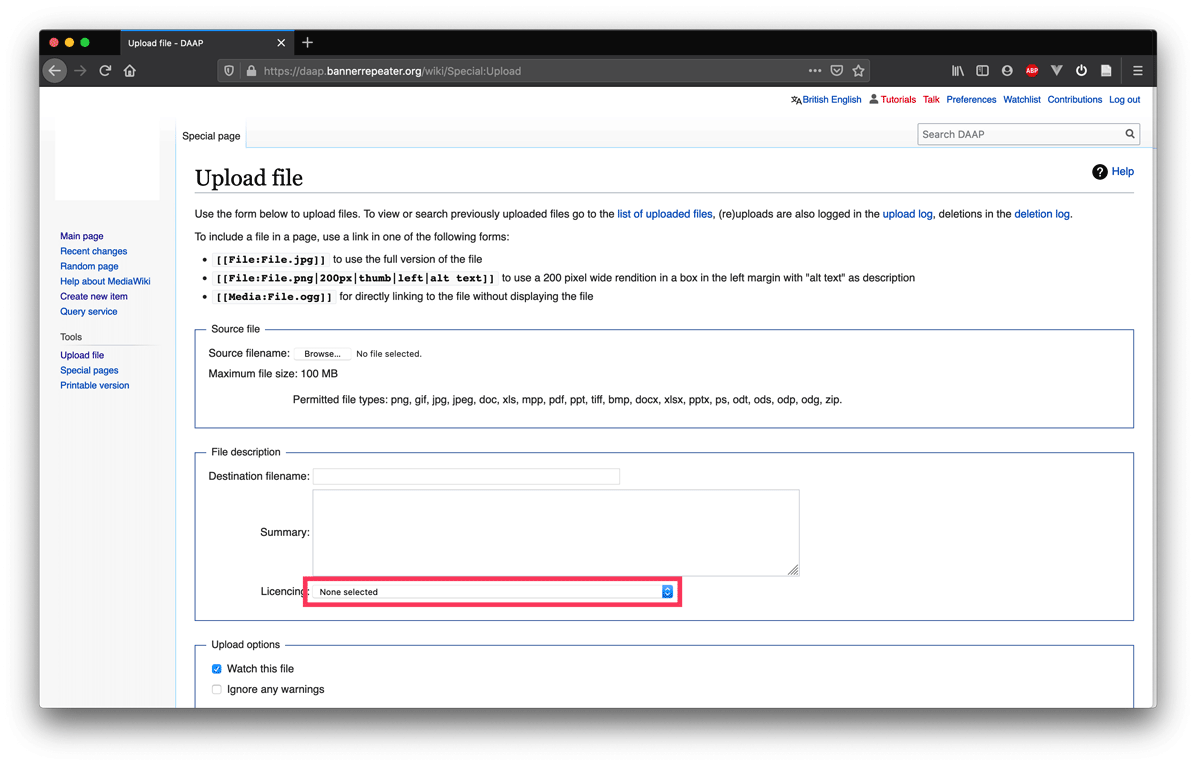
Licensing: Click on the drop down menu to select the form of licensing that applies to your image.
We have three types of licenses in the database:
1. Public domain (CC0), which means you give up all rights to your work (we don’t really recommend this unless it’s a conceptual part of your work).
2. Creative Commons license – there are a range of nuance and variation among these, but there are very good sources online to pick and choose the right one for you. For example, you can read more about all CC options here, or use the Chooser tool here.
3. Copyrighted, meaning you reserve all your rights and no one can use your image for any purpose without your permission; This can be necessary sometimes, but our recommendation is to consider among the more nuanced creative commons options.
Step 7
Upload Options: Here you have the option to check the box "Watch this file" if you would like to receive a notification every time another user applies any modifications to the file. You can control notification preferences in your user settings if you change your mind later.
Do not check the box for “ignore any warnings”.
Step 8
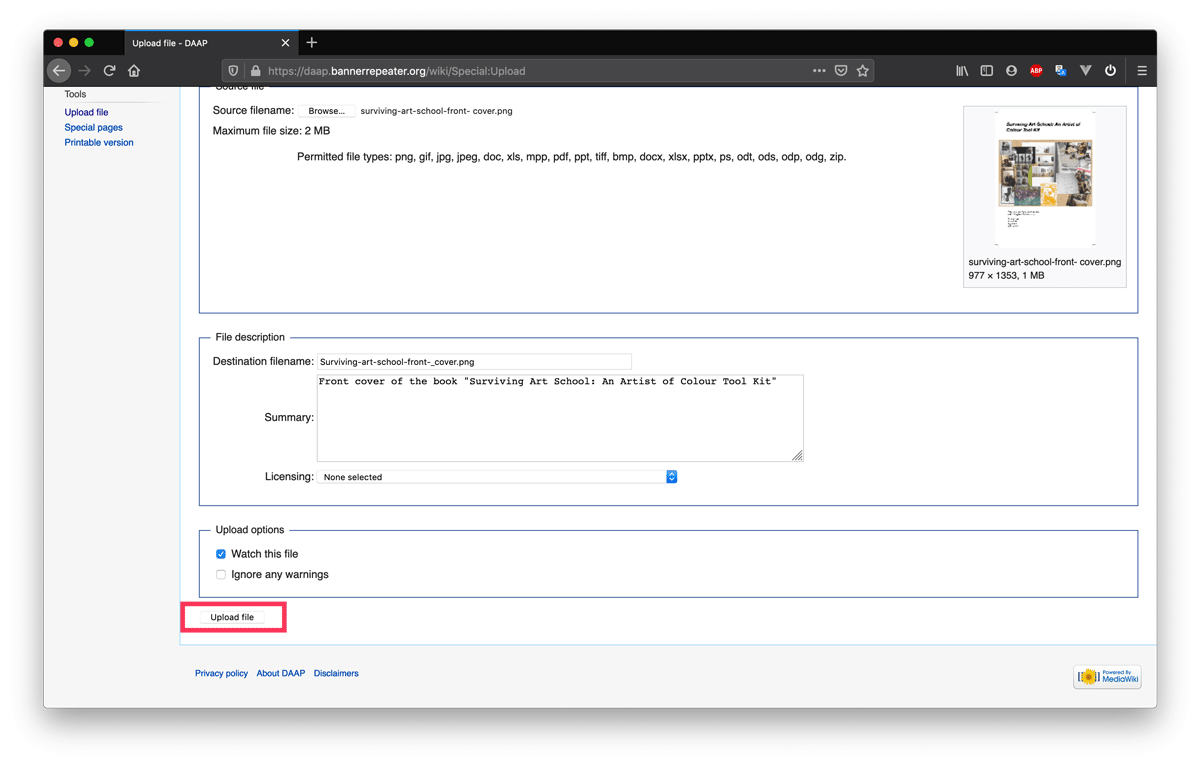
Click on the button "Upload file" at the bottom of the page.
You have now uploaded the media file to the database and you will be automatically redirected to the media file page of the uploaded file.
Step 9
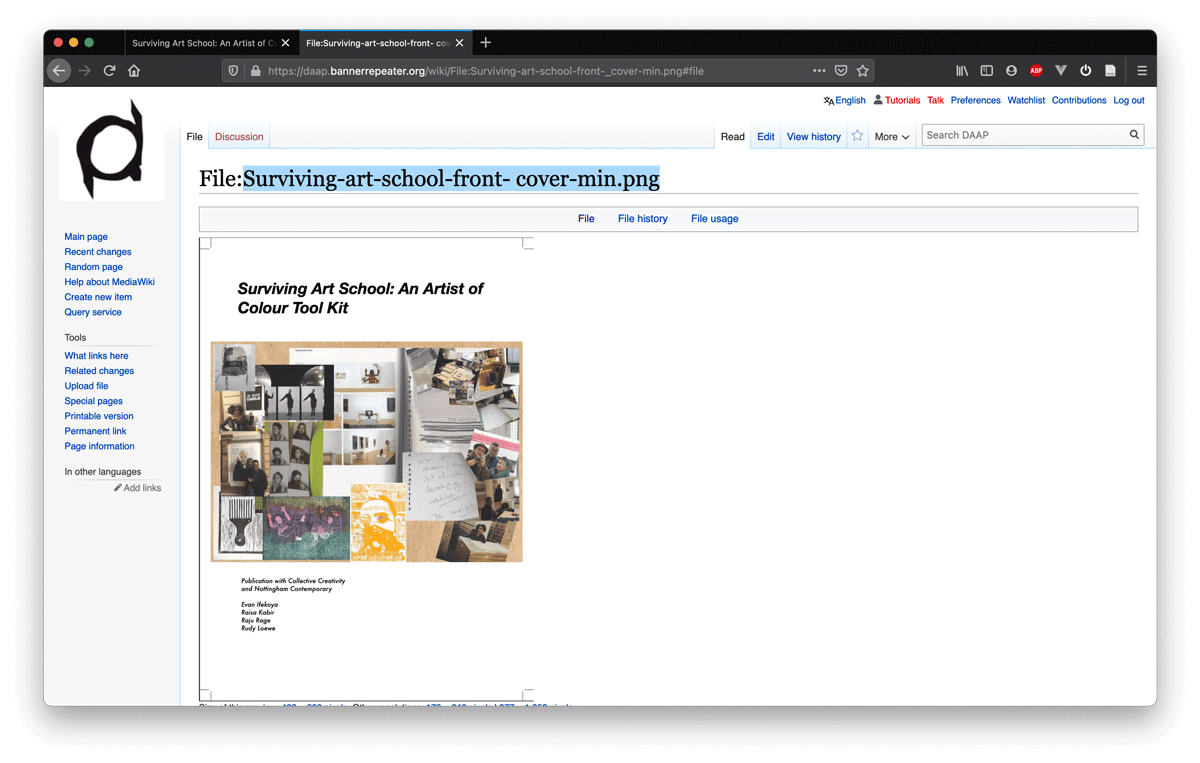
To link the uploaded media to your Item page copy the file name, which you find at the top of the page of the uploaded and saved file.
Step 10
Go to your item page and click on "+ add statement".
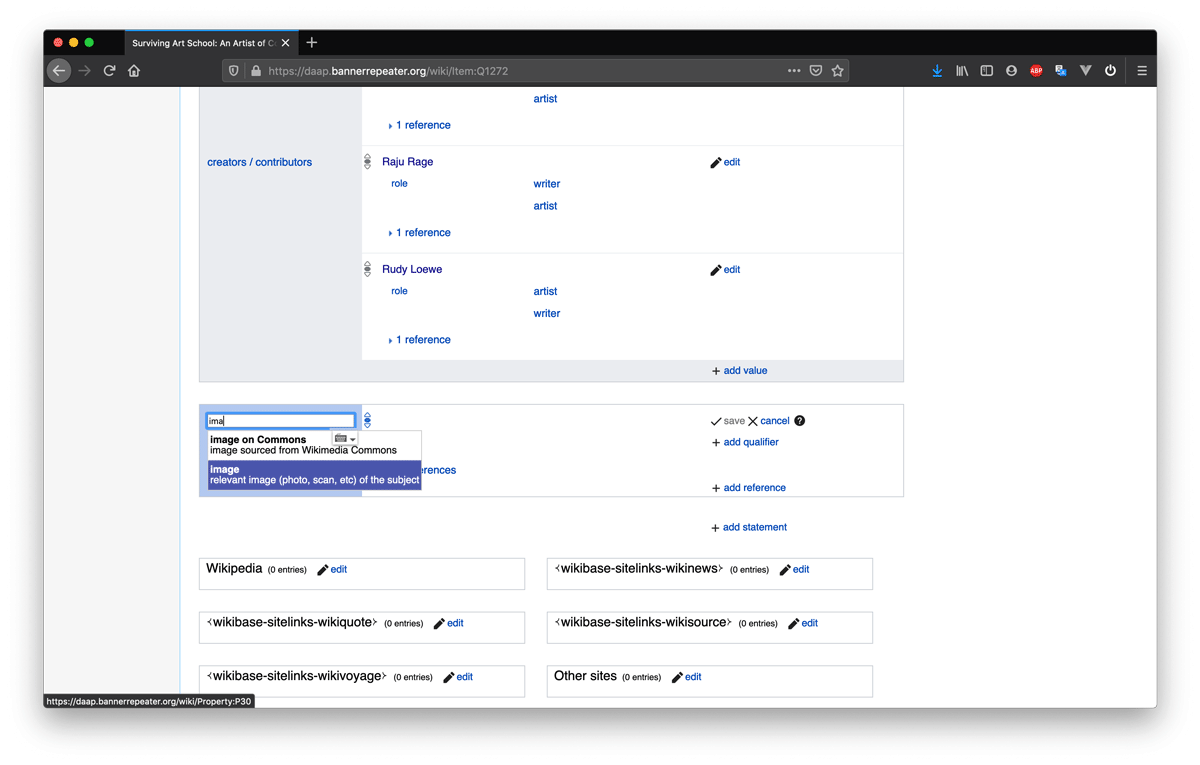
In the box for properties start writing "image" and select the auto suggested property "Image".
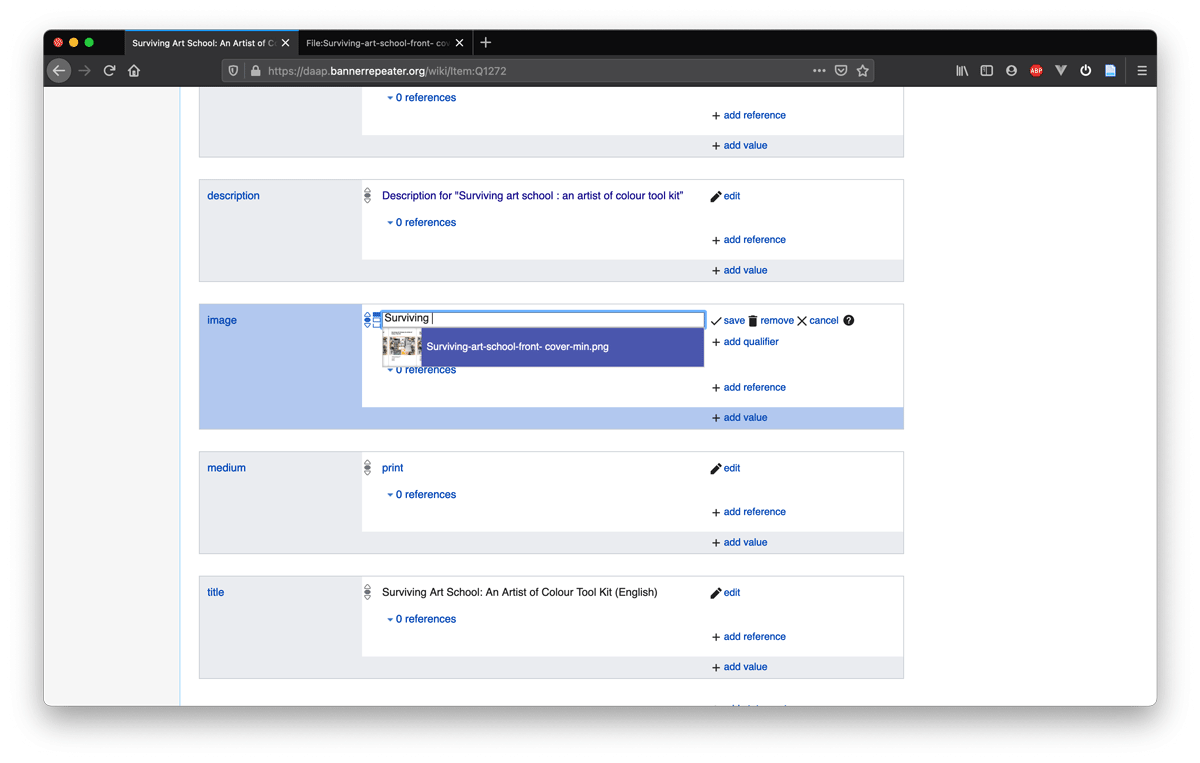
In the next field to the right paste in the file name for the media file page you copied before. If you don’t have it copied you can just start typing the file name and corresponding files will be auto suggested as you type. Click on the auto suggested options to select them.
Now you can press save and your image will be linked to your Item page, or, you can add some qualifiers before you save.
Step 11
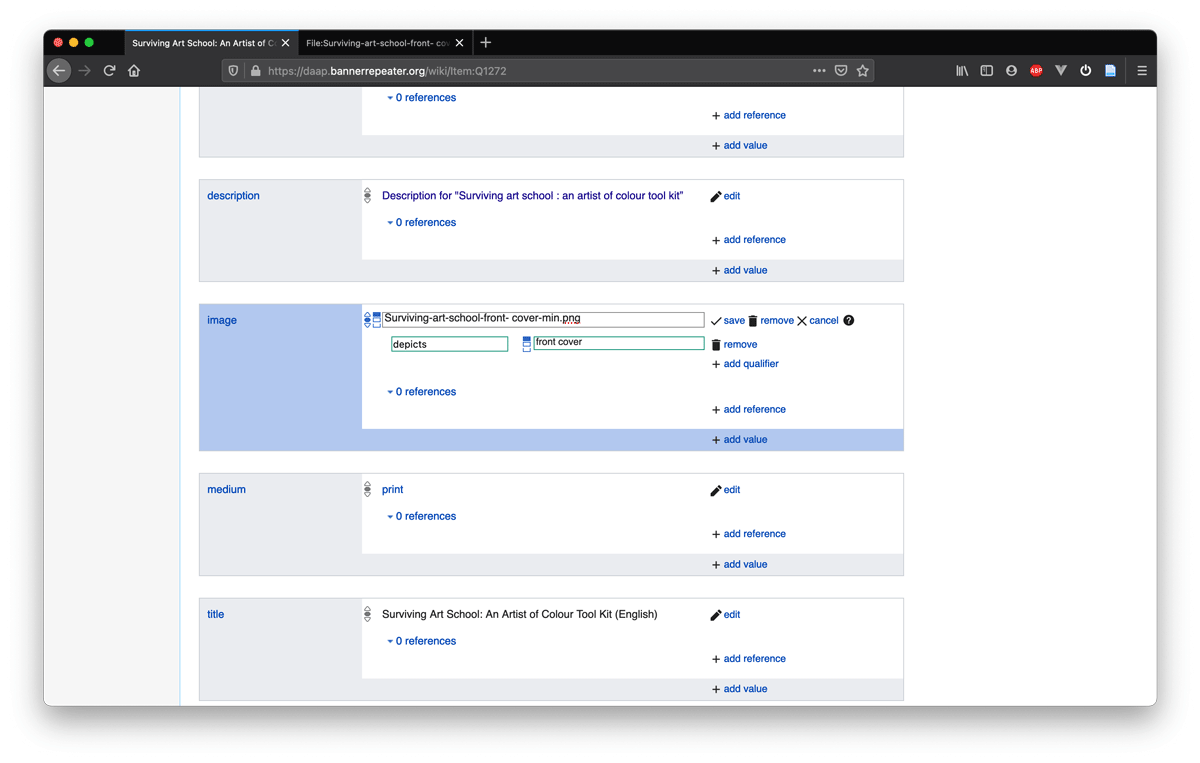
To do this click on "+ add qualifier".
In the field that appears you can choose different properties. Some that you may want to add if your media is an image the qualifiers which can be used with this property are “depicts”, “annotation” and “license”.
Depicts: is used to describe what this image depicts : front cover; back cover; title page; etc.
License: will be the license under which this copyrighted work is released.
Annotation: are notes to the image.
Once you have entered the data for your qualifiers, press “save”.
You have now added an image to your Item.
Step 12
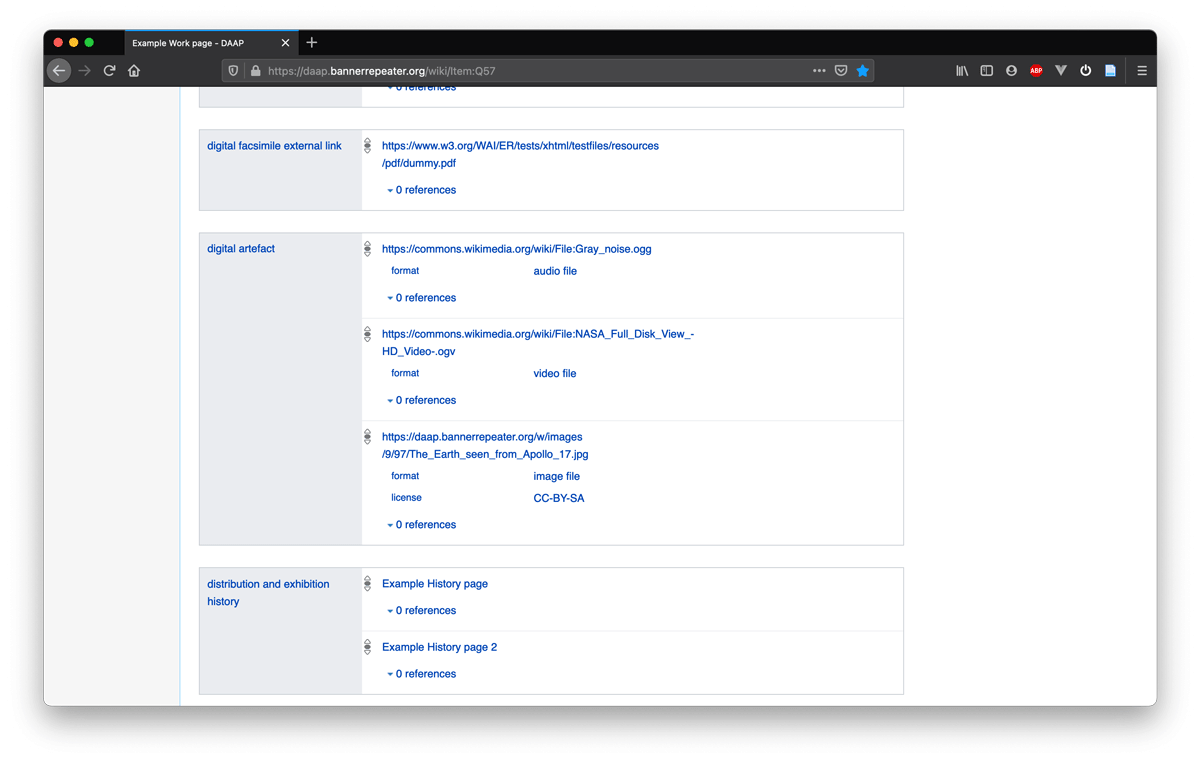
If you are adding other media, that is not the work itself but rather secondary documentation related to it, such as an image from an event, a video or an audio file, it has a similar process but is added using the property “digital artefact”. Digital artefacts will appear in a different section on the front-end so even if they may also be images, make sure you use this property instead.
To see an example of how the property “digital artefact” is used go to our Example Work Page and scroll down to the statement “digital artefact”. You can always find the Example Work Page under the header “Example artwork pages and case studies” on the Main Page.
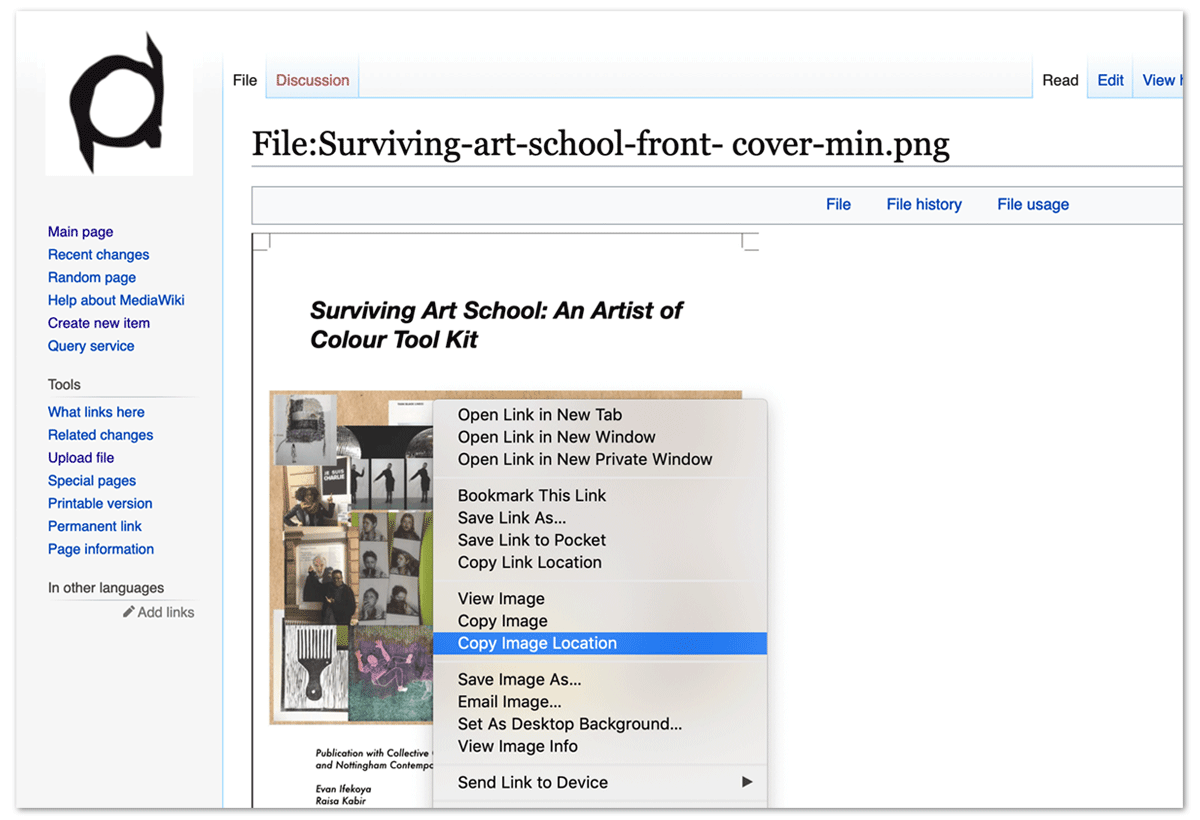
The property “digital artefact” requires a URL to be entered as its value. If what you are adding is:
An image: Follow Step 1-8 of this tutorial. When you get to Step 9, instead of copying the file name you need to copy the URL from the address bar in your browser of the page of the uploaded and saved image file. You can get this URL also by right-clicking the image and using the Copy Image Location option from the contextual menu.
A video or sound file: To link a video or a sound file to your Item, it needs to be uploaded to another website such as Soundcloud, YouTube, Wikimedia Commons, among others. Copy the URL used to access the media file at the site where it is uploaded. In Wikimedia Commons you can copy the URL to the file from the address bar.
Step 13
When you have copied the URL to your media file follow Step 10 - 11 of this tutorial, but instead of using the property “image” in your statement you need to use the property “digital artefact”. As the value to your property you paste the URL you have copied.
Before you press save you can add which format the file is in. To do this press “+ add qualifier” and start typing “format” in the property bar. It will be auto suggested as you type.
To add the value in the next bar, choose “image file” if your file is an image, or alternatively “video file” or “audio file”, as it corresponds to the file.
As an optional step, if your file is an image, you may also add an additional qualifier using the property “licence” to add under which licence you are sharing the image. In the value bar start typing the name of the license you chose when uploading the image. The license which will be auto suggested as you type. Click on it from the suggestions to choose.
Press “save”.