Tutorial 5: Difference between revisions
(→Step 3) |
|||
| (3 intermediate revisions by the same user not shown) | |||
| Line 35: | Line 35: | ||
===Step 4=== | ===Step 4=== | ||
Navigate to the Create a new Item page. You can access it via the Main page, from the left side menu, or directly via [https://daap.bannerrepeater.org/wiki/Special:NewItem this link]. | |||
We recommend opening this page in a separate browser tab. Right/option click on the link and select “Open in new tab”. | |||
For a reminder of how to create a new Item, follow [https://daap.network/tutorial_3 Tutorial 3]. | |||
===Step 5=== | ===Step 5=== | ||
After you create the new Item, don’t forget to add its type via the Property “instance of”. In this case the type is '''contributor''', but as you create more new Items in the database, you may need to use types such as '''collective''', '''organisation''', etc. It is important not to skip this step especially for all the creators or publishers of a work. | |||
https://daap.bannerrepeater.org/w/images/8/81/Tutorial5_new_img.jpg | |||
===Step 6=== | |||
https://daap.bannerrepeater.org/w/images/2/2d/Tutorial4_img4.png | https://daap.bannerrepeater.org/w/images/2/2d/Tutorial4_img4.png | ||
When you have created a separate | When you have created a separate Item for the creator, return to your Item (the published work) page and try again to begin typing the creator’s name into the Value field. The creator’s name should now appear as an auto-suggestion when you type. Select it and save the Statement. | ||
===Step | |||
To add or | ===Step 7=== | ||
To add or edit information within a Statement, click on the “edit” button at the upper right corner of the shaded box. | |||
https://daap.bannerrepeater.org/wiki/File:Tutorial4_img5.png | https://daap.bannerrepeater.org/wiki/File:Tutorial4_img5.png | ||
Click | Click "+add qualifier" to provide additional detail about the role the person performed in creating the publication or contributing to its creation. | ||
https://daap.bannerrepeater.org/w/images/b/b6/Tutorial4_img6.png | https://daap.bannerrepeater.org/w/images/b/b6/Tutorial4_img6.png | ||
In the | In the field labelled "Property", begin typing the word “role”. Click on the suggestion to select it and auto-complete the text. | ||
https://daap.bannerrepeater.org/w/images/4/4a/Tutorial4_img7.png | https://daap.bannerrepeater.org/w/images/4/4a/Tutorial4_img7.png | ||
In the | In the Value field to the right, add the person’s role. For example, writer, editor, or graphic designer. | ||
You can find | You can find a sample of available roles in the [https://docs.google.com/spreadsheets/d/1PtX5g-T6T8d7GSq7uYNNhPPrbHU91U-GV4aF2W18occ/edit?usp=sharing Item Index tab of our Data Model] spreadsheet. However, keep in mind, this Index is not always up-to-date, so the best way to make sure if a role exists is to search for it in the database. If it does not exist, remember that you need to add a new Item for that role. | ||
https://daap.bannerrepeater.org/w/images/3/36/Tutorial4_img8.png | https://daap.bannerrepeater.org/w/images/3/36/Tutorial4_img8.png | ||
You | You may add multiple qualifiers to one individual if they played multiple roles. | ||
https://daap.bannerrepeater.org/w/images/5/5c/Tutorial4_img9.png | |||
When you are satisfied with the roles and qualifiers you’ve recorded in the Statement, click “save”. | |||
===Step 8=== | |||
===Step | |||
https://daap.bannerrepeater.org/w/images/9/96/Tutorial4_img10.png | https://daap.bannerrepeater.org/w/images/9/96/Tutorial4_img10.png | ||
Qualifiers can be used within various statements to add different details around a particular statement, i.e. they are not inherently linked to the property “role”. | |||
For example, if you wish, you can support any Statement with a reference/citation. To do this, click "+ add qualifier" once again. | |||
Choose the | Choose the Property "source", then in the Value field add a URL to your reference. Click “save”. | ||
''N.B. We are not using Wikidata’s “+ add reference” function. Please use “+add qualifier” instead.'' | |||
We recommend adding a source only in cases where it may not be obvious, e.g. there is no need to record the publication colophon as source for every statement. However, a source could be useful to add if there is conflicting information available in multiple sources, for example, if a different publication date is listed on the publication colophon than on the artist’s website. | |||
===Step 9=== | |||
===Step | You have now successfully linked a new Creator (Item) to a published Work (Item). | ||
You have now | |||
https://daap.bannerrepeater.org/w/images/5/54/Tutorial4_img11.png | https://daap.bannerrepeater.org/w/images/5/54/Tutorial4_img11.png | ||
Where there are multiple creators/contributors, we suggest adding them within a single Statement. Simply click "+ add value" in the lower right of the shaded box, and repeat the process outlined from Step 2 of this tutorial. Each time, start by trying to type the name of the creator you want to name, establishing whether a record for them already exists in the database (or not – add it, if necessary), and defining their role. | |||
===Step | |||
===Step 10=== | |||
Any Items linked as Values within an Item page, will automatically operate as reverse links, too. | |||
For example, once an Item, such as the Item for creator or publisher, is linked to in the publication’s Item page via the properties “creators / contributors” or “publisher”, that statement will automatically create a reverse link within the database, too. These links are accessible via the “What links here” option in the Tools section of the Menu sidebar on the respective Item pages for the creator or publisher. | |||
https://daap.bannerrepeater.org/w/images/c/c5/Tutorial4_img12.png | https://daap.bannerrepeater.org/w/images/c/c5/Tutorial4_img12.png | ||
This is a fast and efficient way to discover cross-references | This is a fast and efficient way to discover cross-references within the database, which removes the need to manually create ‘reverse Statements’ (i.e. manually listing all the works an artist has created on their own Item page). | ||
https://daap.bannerrepeater.org/w/images/0/02/Tutorial4_img13.png | https://daap.bannerrepeater.org/w/images/0/02/Tutorial4_img13.png | ||
''Once you have added sufficient information about your publication Item in the database, feel free to add the Property “date added” and add today’s date as the Value. This is a special property (which is not mandatory, but recommended), as it will ensure your publication gets featured on the homepage of the archive.'' | |||
Latest revision as of 23:24, 30 July 2021
Tutorial 5
Linking other items needed to describe a work
At the end of Tutorial 4, we established that adding Statements about who created/contributed, published, or commissioned a work often involves referring to multiple other Items (which, as explained in Tutorial 3, can be person(s) or organisations as well as published works, objects and processes, among other things).
Each and every Item you refer to must exist within the database for a Statement to be made.
So, to add all the information relevant to your Item, you may find you need to create other new Items first.
For example, to make a Statement about who created a work (Item), you must ensure that an Item page exists for the creator as well.
Search the database to check. Then, if the creator (Item) does not yet exist in the archive, you must add it.
The following steps will guide you through adding a Statement about the creator/contributors of a published work to your Item page about this work.
Step 1
Click on “+ add statement”.
Step 2
Start typing "creators / contributors" in the box labelled "Property", it will appear as an auto-suggested option. Click on the suggestion to select it and auto-complete the text.
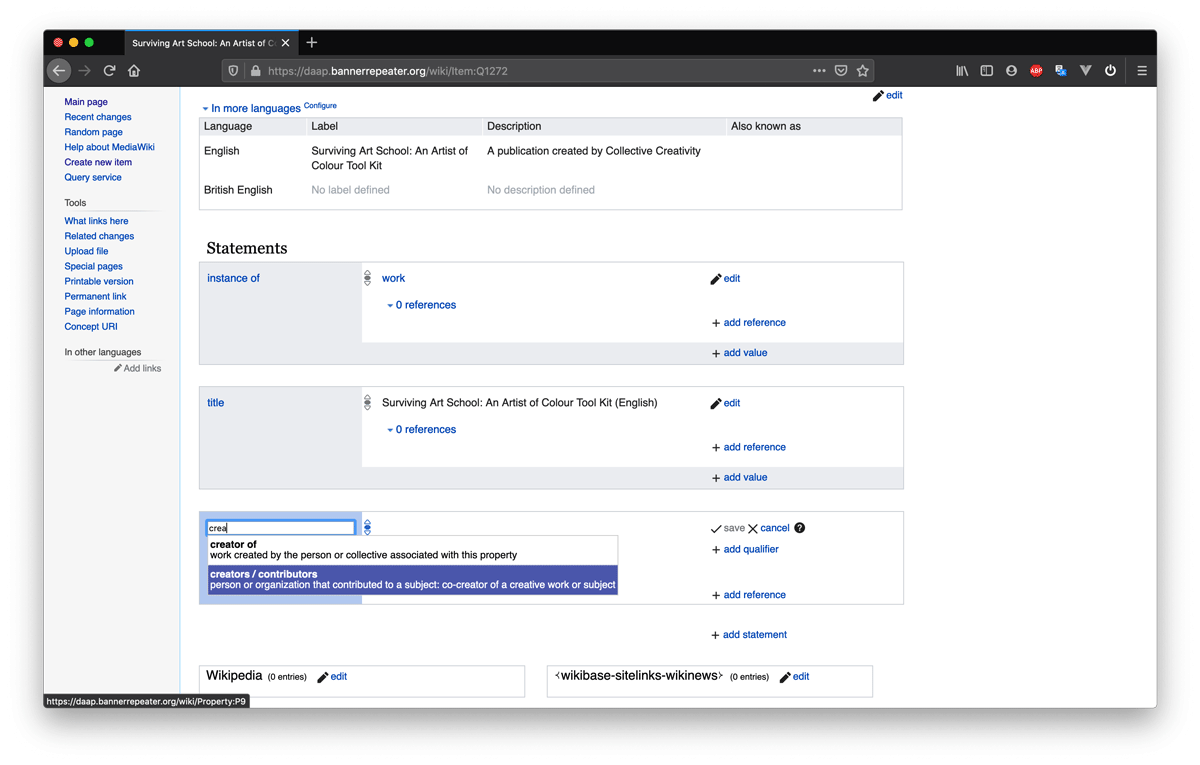
Step 3
Before you add any new Item you always want to make sure it doesn’t already exist in the database.
Start typing the name of the creator in the Value field on the right.
If you see an auto-suggestion corresponding to the name of the person you're looking for, click to select it, then click to Save the statement. No further action is needed, unless you want to add a qualifier to describe the role that person performed in relation to the work. If so, jump ahead to Step 6 of this tutorial.

However, if you finish typing the name of the creator, but no suggestion appears you will encounter the message: "No match was found". This indicates that you will need to make a new Item for the creator because they do not yet exist in the database.
Step 4
Navigate to the Create a new Item page. You can access it via the Main page, from the left side menu, or directly via this link.
We recommend opening this page in a separate browser tab. Right/option click on the link and select “Open in new tab”.
For a reminder of how to create a new Item, follow Tutorial 3.
Step 5
After you create the new Item, don’t forget to add its type via the Property “instance of”. In this case the type is contributor, but as you create more new Items in the database, you may need to use types such as collective, organisation, etc. It is important not to skip this step especially for all the creators or publishers of a work.
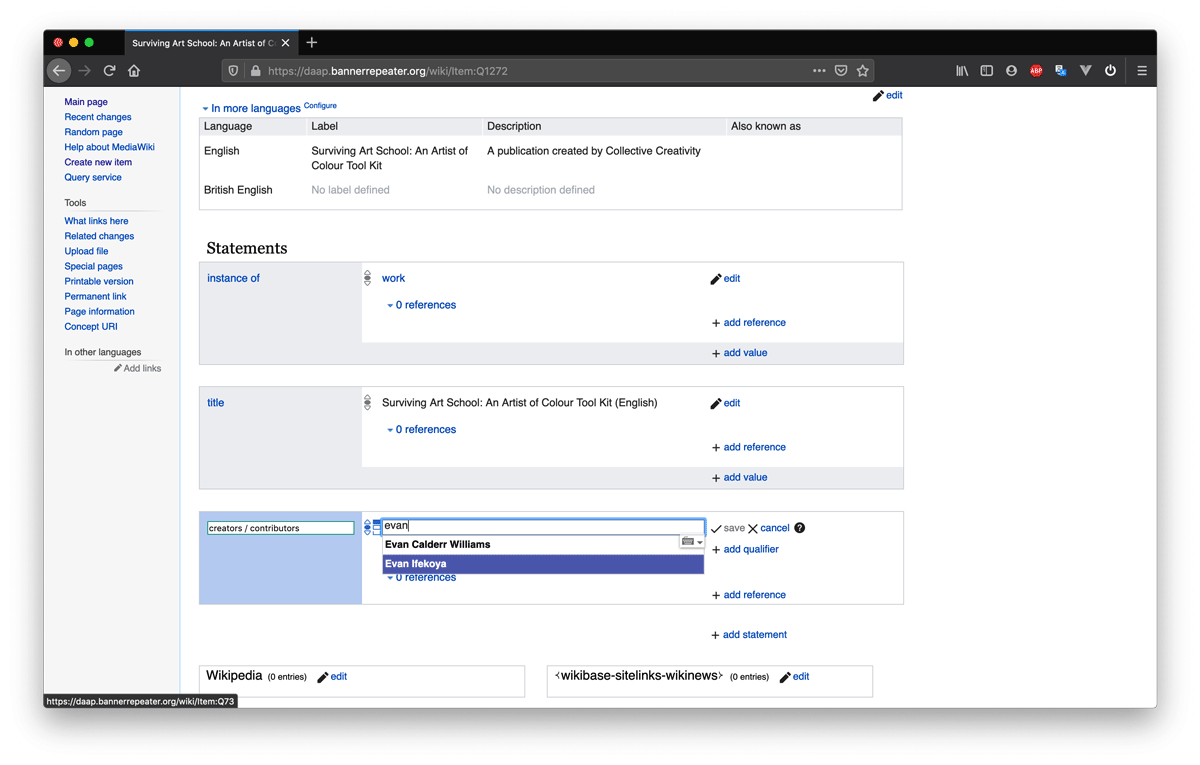
Step 6
When you have created a separate Item for the creator, return to your Item (the published work) page and try again to begin typing the creator’s name into the Value field. The creator’s name should now appear as an auto-suggestion when you type. Select it and save the Statement.
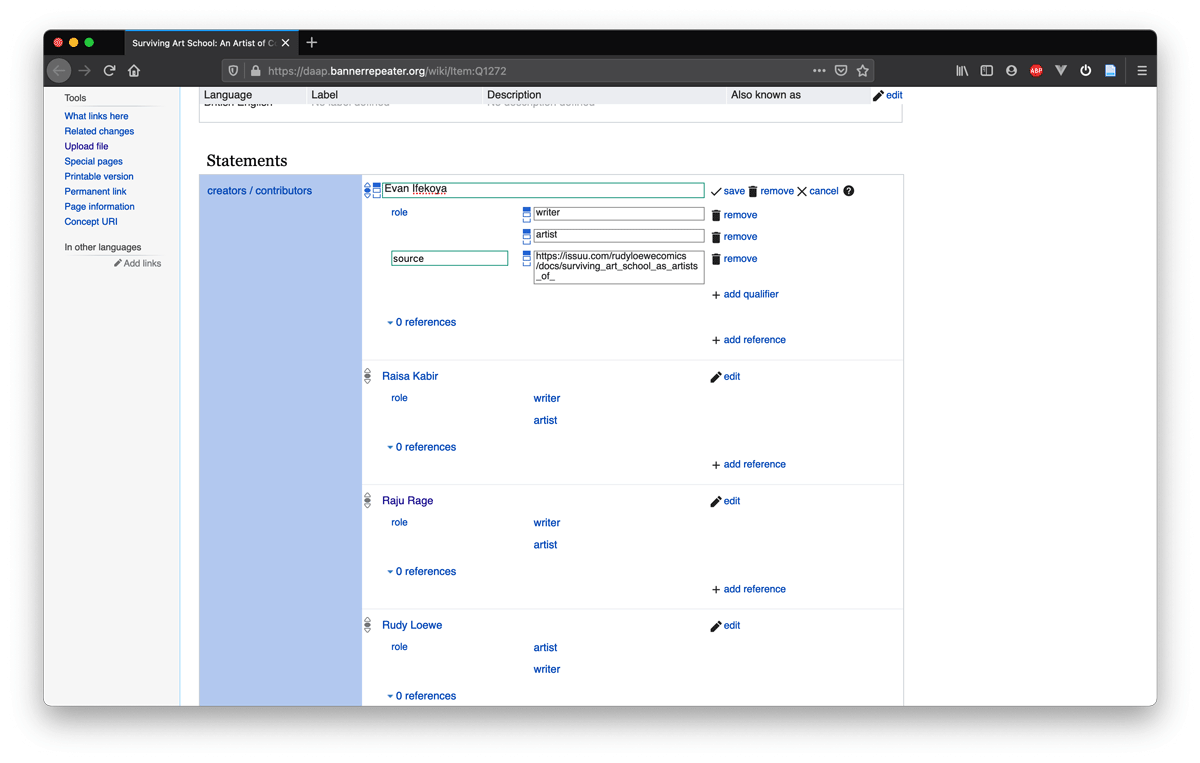
Step 7
To add or edit information within a Statement, click on the “edit” button at the upper right corner of the shaded box.
https://daap.bannerrepeater.org/wiki/File:Tutorial4_img5.png
Click "+add qualifier" to provide additional detail about the role the person performed in creating the publication or contributing to its creation.
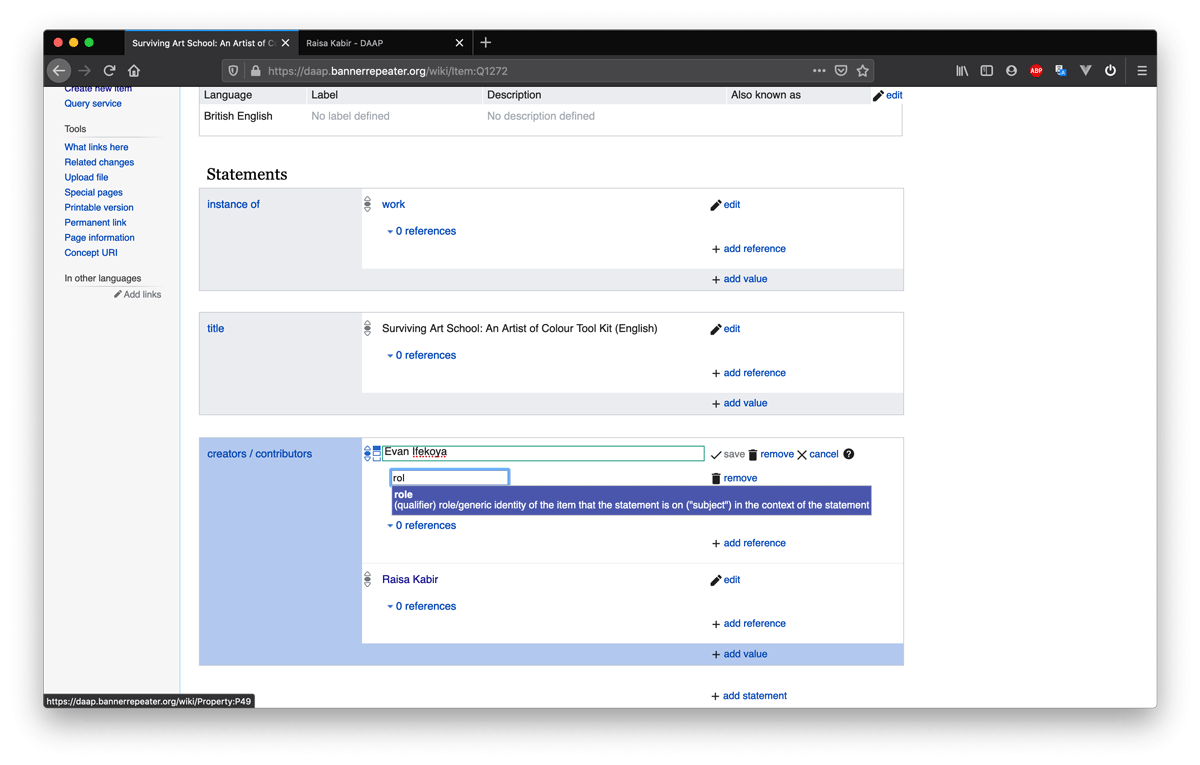
In the field labelled "Property", begin typing the word “role”. Click on the suggestion to select it and auto-complete the text.
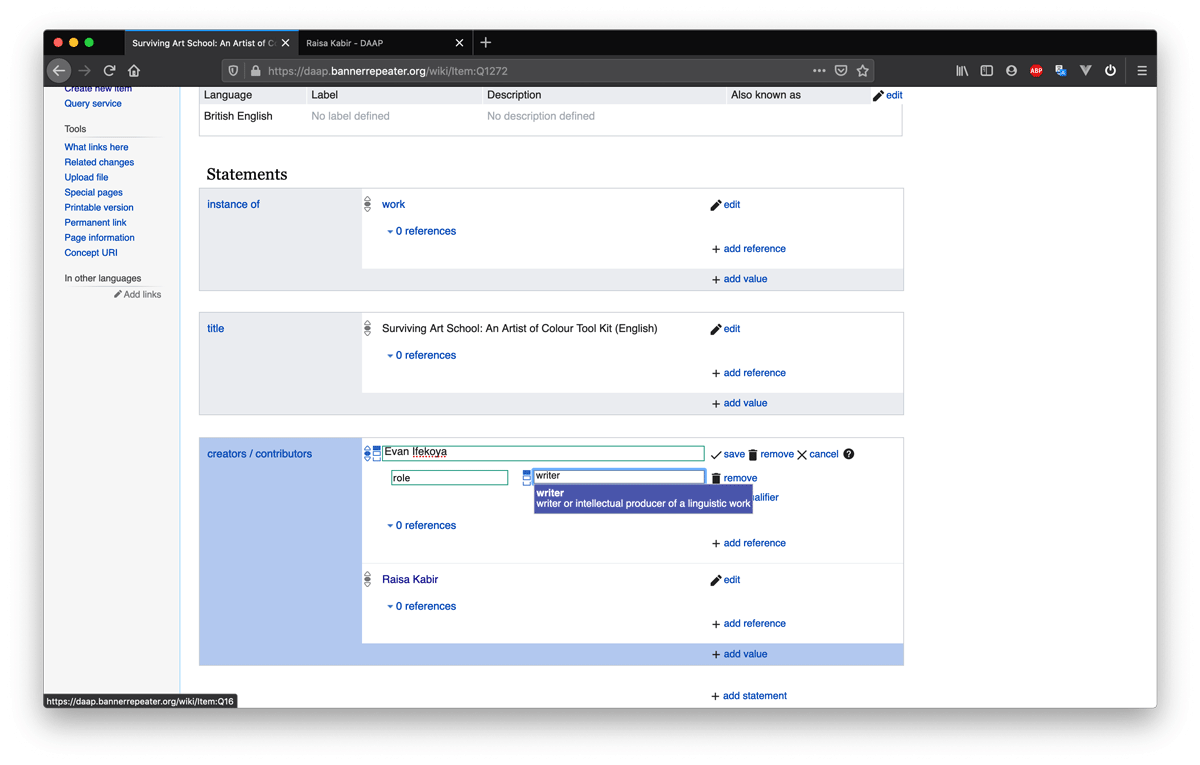
In the Value field to the right, add the person’s role. For example, writer, editor, or graphic designer.
You can find a sample of available roles in the Item Index tab of our Data Model spreadsheet. However, keep in mind, this Index is not always up-to-date, so the best way to make sure if a role exists is to search for it in the database. If it does not exist, remember that you need to add a new Item for that role.
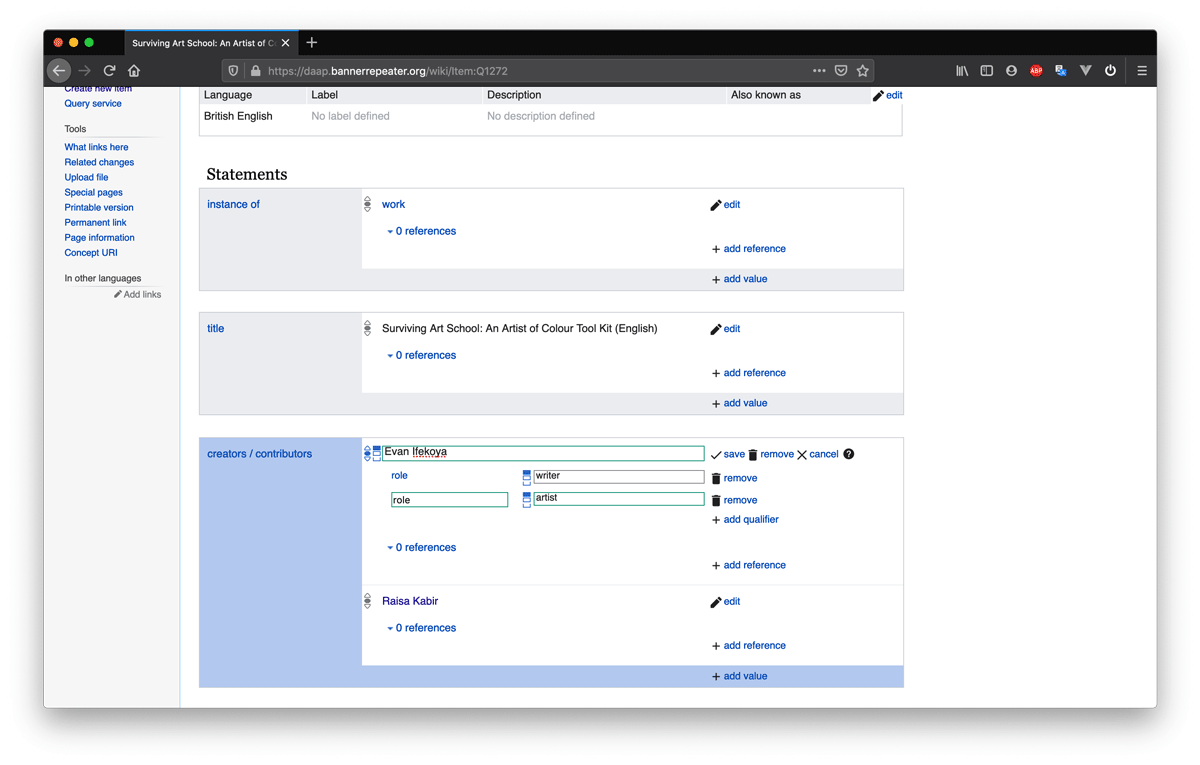
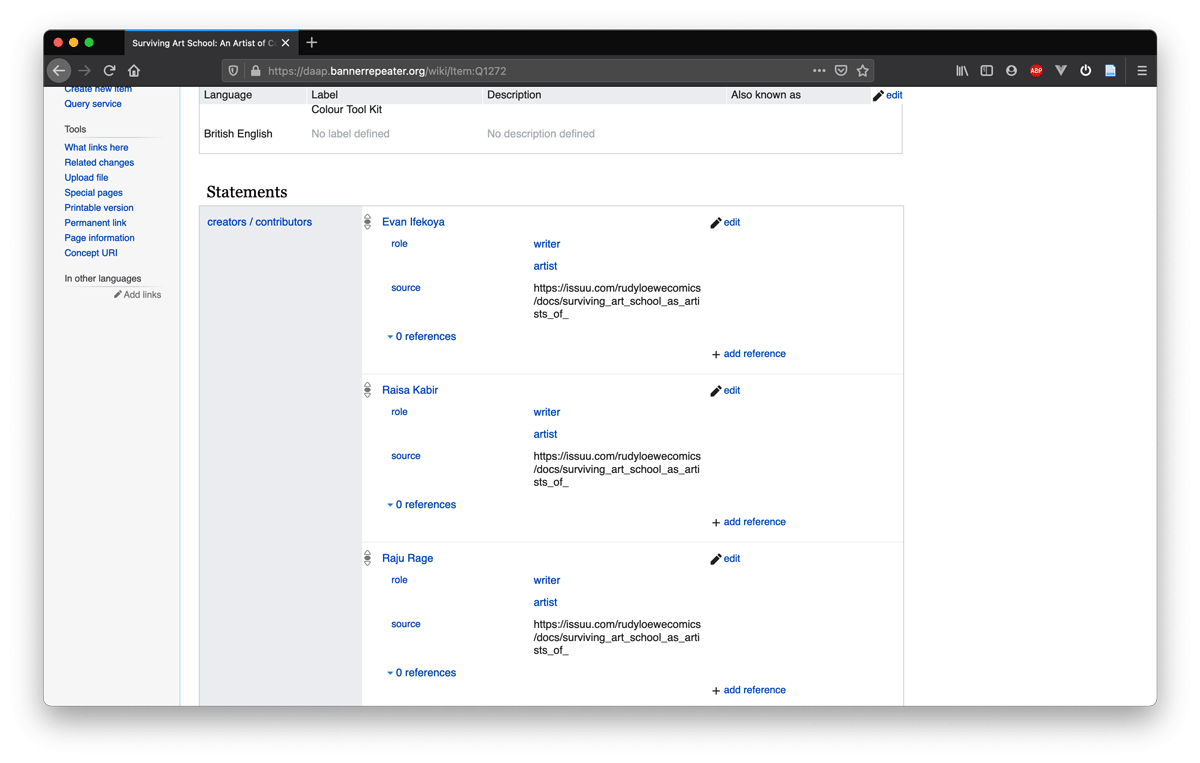
You may add multiple qualifiers to one individual if they played multiple roles.
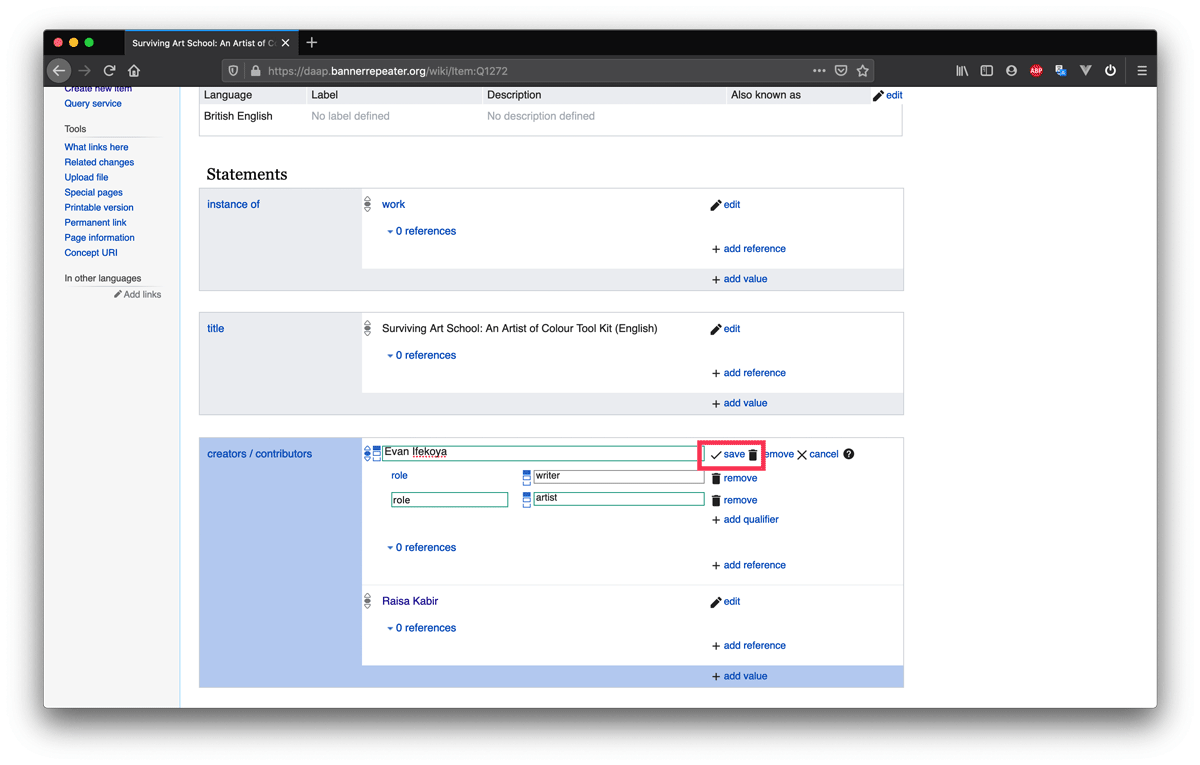
When you are satisfied with the roles and qualifiers you’ve recorded in the Statement, click “save”.
Step 8
Qualifiers can be used within various statements to add different details around a particular statement, i.e. they are not inherently linked to the property “role”.
For example, if you wish, you can support any Statement with a reference/citation. To do this, click "+ add qualifier" once again.
Choose the Property "source", then in the Value field add a URL to your reference. Click “save”.
N.B. We are not using Wikidata’s “+ add reference” function. Please use “+add qualifier” instead.
We recommend adding a source only in cases where it may not be obvious, e.g. there is no need to record the publication colophon as source for every statement. However, a source could be useful to add if there is conflicting information available in multiple sources, for example, if a different publication date is listed on the publication colophon than on the artist’s website.
Step 9
You have now successfully linked a new Creator (Item) to a published Work (Item).
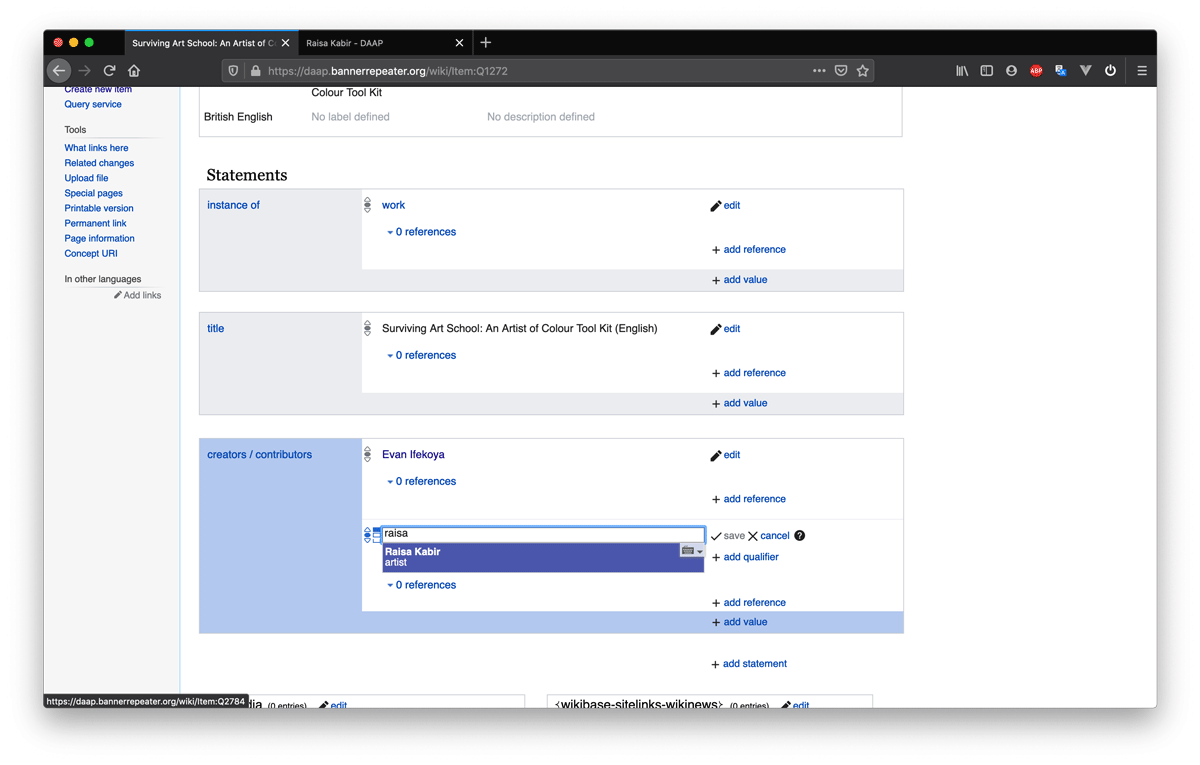
Where there are multiple creators/contributors, we suggest adding them within a single Statement. Simply click "+ add value" in the lower right of the shaded box, and repeat the process outlined from Step 2 of this tutorial. Each time, start by trying to type the name of the creator you want to name, establishing whether a record for them already exists in the database (or not – add it, if necessary), and defining their role.
Step 10
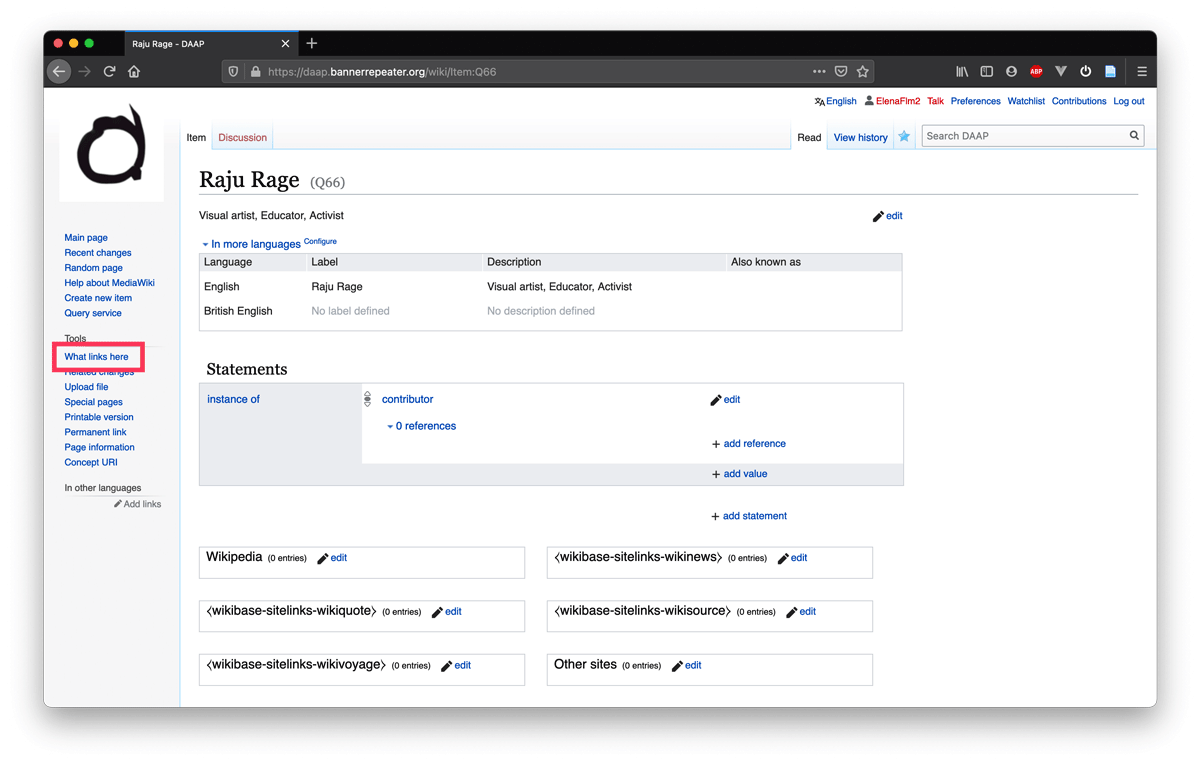
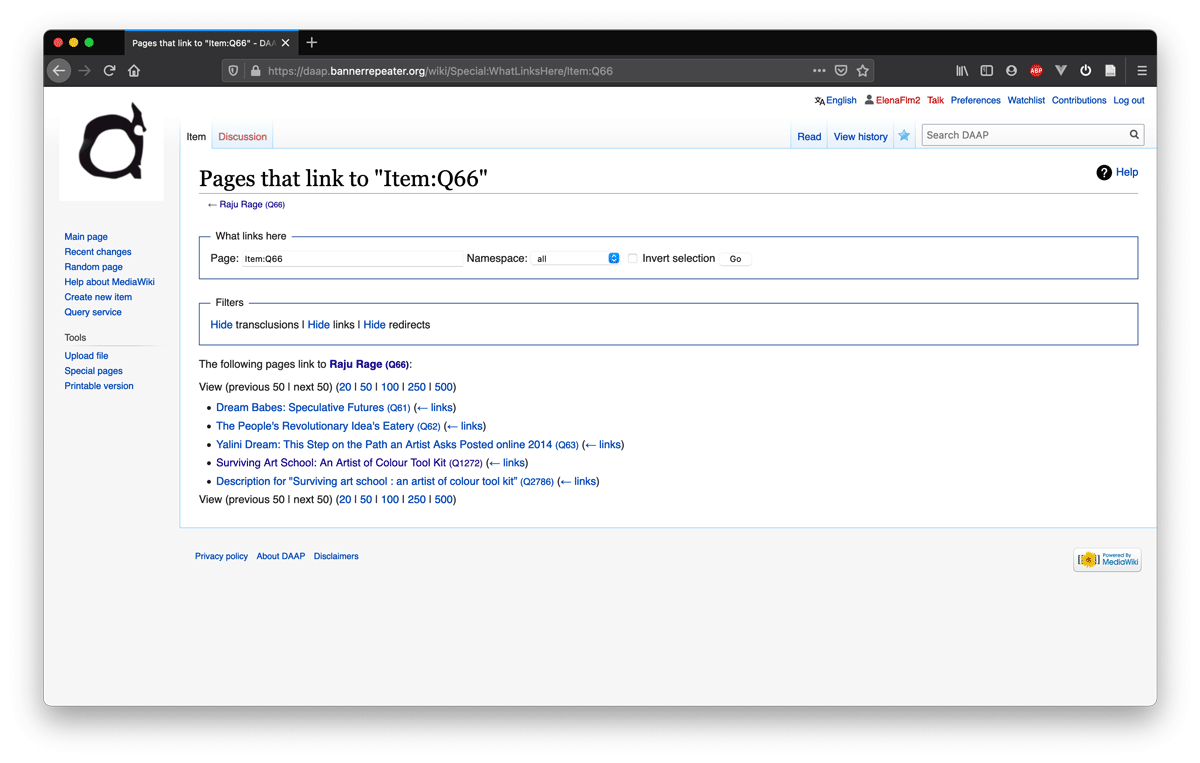
Any Items linked as Values within an Item page, will automatically operate as reverse links, too.
For example, once an Item, such as the Item for creator or publisher, is linked to in the publication’s Item page via the properties “creators / contributors” or “publisher”, that statement will automatically create a reverse link within the database, too. These links are accessible via the “What links here” option in the Tools section of the Menu sidebar on the respective Item pages for the creator or publisher.
This is a fast and efficient way to discover cross-references within the database, which removes the need to manually create ‘reverse Statements’ (i.e. manually listing all the works an artist has created on their own Item page).
Once you have added sufficient information about your publication Item in the database, feel free to add the Property “date added” and add today’s date as the Value. This is a special property (which is not mandatory, but recommended), as it will ensure your publication gets featured on the homepage of the archive.